
|
Quantity
|
Total
|
||
|
|
|||
|
|
|||
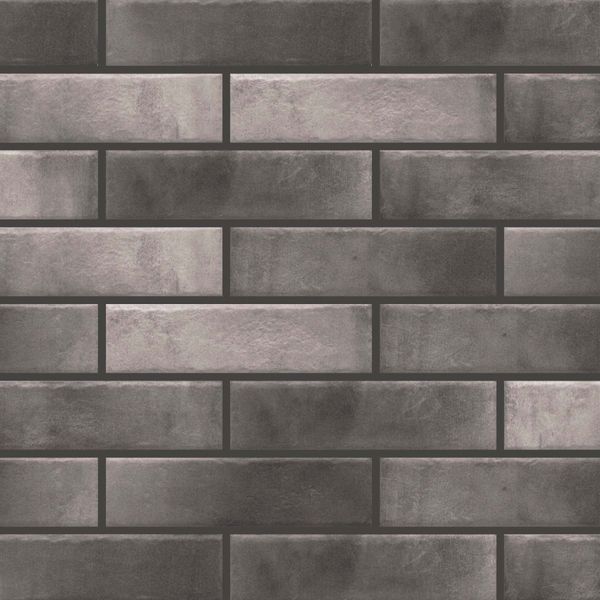
Facade Thermal Panel Primeberg Retro Brick Pepper
Retro Brick Pepper — a stylish dark grey accent for modern buildings.
The thermal panel combines EPS-100 insulation and clinker tiles from Cerrad in the Pepper shade with a matte surface. Deep grey colours with subtle graphite tones give the facade dynamism and restrained elegance.
This colour perfectly harmonises with white, beige, or wooden elements and also emphasises contrasts in modern architectural projects. Retro Brick Pepper is the choice for those who appreciate urban style and a premium atmosphere.
Suitable building types
- Private houses and cottages — elegant appearance and thermal insulation.
- Summer houses and country homes — comfort throughout the year.
- Multi-apartment residential buildings — reduction of heating costs and a modern exterior appearance.
- Commercial buildings (shops, offices, restaurants) — an attractive facade and savings on utility expenses.
- Industrial buildings — efficient insulation and aesthetic appearance.
Why choose Primeberg thermal panels?
- Modern production with quality control.
- 20-year warranty.
- Easy and fast installation.
- Insulation and facade decoration in one material.
- Heat retention in winter and coolness preservation in summer.
Technical specifications
| Parameter | Value |
|---|---|
| Tile colour | Grey / Graphite |
| Texture | Matte |
| Tile type | Clinker gres tile |
| Tile manufacturer | Cerrad |
| Panel size (W × L) | 1040 × 560 mm |
| Thermal conductivity (λ) | 0.037 W/m·K |
| Polystyrene class | EPS-100 (Density — 18 kg/m³) |
| Water absorption | 2–4% |
| Weight | from 5 to 15 kg (depending on thickness) |
| Area of one panel | 0.582 m² |
| Quantity per 1 m² | 2 pcs |
Polystyrene thickness: which one to choose?
Not sure which thickness to choose? Below is a short recommendation depending on the building type and climate conditions. If you have doubts, we will help you select the optimal solution specifically for your project.
| Thickness | Recommendation |
|---|---|
| 50 mm | Minimal additional insulation for already insulated buildings or facades where increasing thickness is not possible. Provides a limited effect and is mainly used as a corrective or decorative solution rather than full thermal insulation. |
| 80 mm | Initial level of thermal insulation for relatively warm walls or regions with a mild climate. In Europe it is used for renovations but does not meet modern energy efficiency requirements for new residential construction. |
| 100 mm | Basic option for small buildings, summer houses, or homes with seasonal occupancy. Provides noticeable reduction of heat loss, but in colder European regions it is already considered the minimum acceptable level. |
| 120 mm | The most balanced solution for most residential country houses in moderate and cold climates. Ensures a comfortable indoor microclimate and real heating cost savings without excessive material consumption. |
| 150 mm | Complies with Ukrainian building regulations regarding thermal insulation of multi-apartment residential buildings. A high-quality solution for energy-efficient homes intended for permanent residence. Significantly reduces heating costs and approaches low-energy or passive house standards. |
| 200 mm | Maximum insulation level for northern regions or buildings with nearly zero energy consumption (NZEB). Used where minimisation of heat loss is a priority rather than initial cost savings and complies with European thermal insulation standards for residential buildings. |
The thicker the polystyrene layer, the better the thermal insulation. We will help you choose the optimal thickness for your building.
Installation and storage recommendations
Installation:
- Surface preparation: Before installation, the facade must be clean, dry, and level. Remove all irregularities and defects if necessary.
- Marking: Carefully mark the placement of panels starting from the bottom row.
- Fixing: Panels are fixed to the wall using special anchors and polyurethane adhesive foam. It is important to follow the manufacturer’s recommendations regarding the number and placement of fixings.
- Joint grouting: After installation, joints between tiles must be filled with a special grout to ensure additional sealing and an aesthetic appearance.
Storage:
- Store thermal panels in a dry, well-ventilated area protected from direct sunlight and moisture.
- Panels should be stored horizontally on a flat surface to prevent deformation.
Want a beautiful and warm facade?
We will select the thickness, colour, and configuration for your building, prepare a 3D preview, and provide an accurate material calculation.
Leave a request on the website or call: +380 (66) 373 13 31